Workmate 79-012 Mitremate Replacement Brackets
I occasionally run across a Black & Decker Mitremate listed for sale online without the two steel mounting brackets required to clamp it between the Workmate jaws. Last year I found a Mitremate in exactly this condition at an estate sale. I decided to buy it and make some replacement brackets, thus rescuing it from probable destruction.
Here is a brief description of what was involved in making the pair of replacement brackets. You can find the owner's manual for the Mitremate on my Documents page, with drawings of the original parts and instructions for how to assemble and use it. I also have a full page about the Mitremate itself.
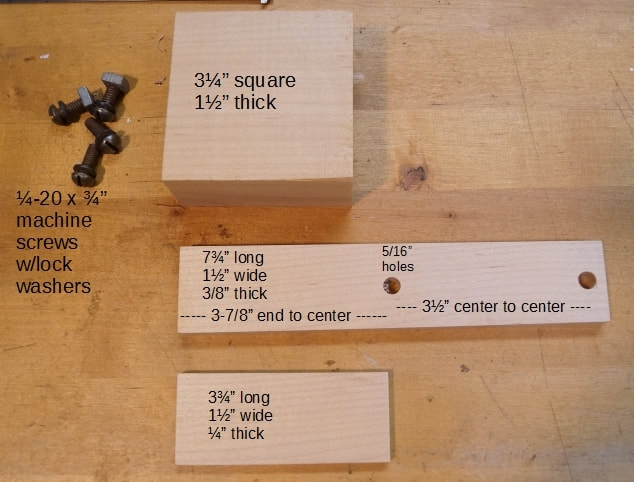
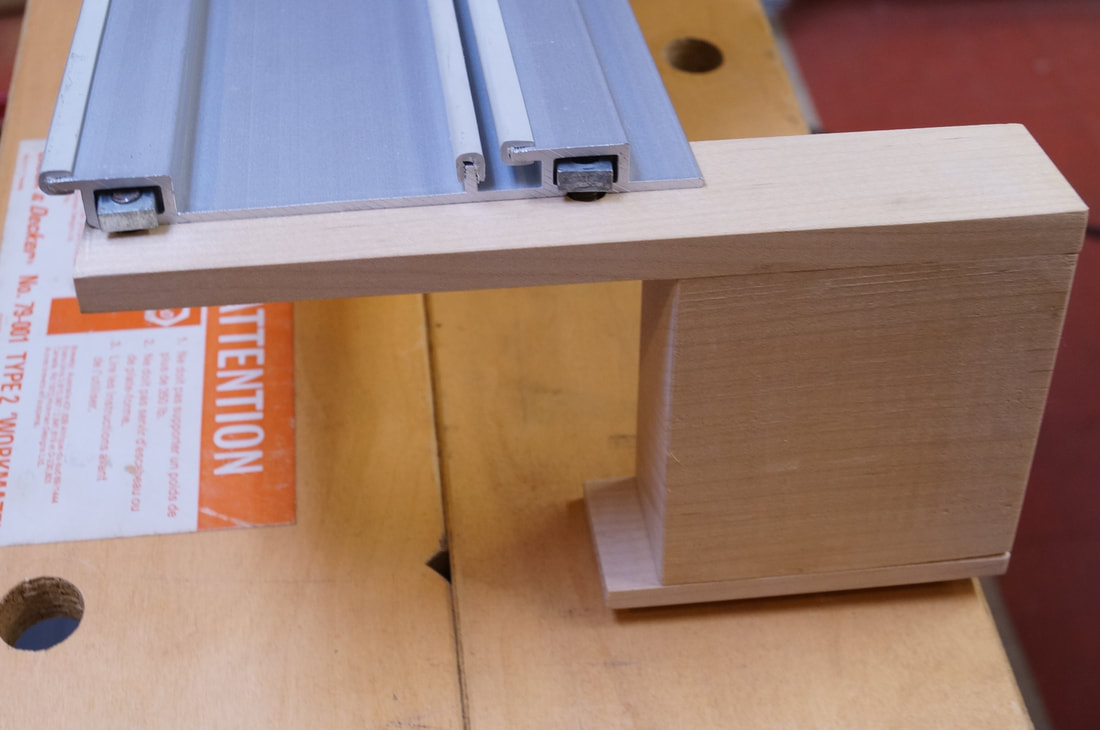
I'm a woodworker, not a metalworker, so I made my replacement brackets from some scraps of hard maple, sized to closely match the overall dimensions of the original metal brackets. They are made of three pieces glued together, shown in the photos below. The part of the bracket that clamps between the jaws is made of a block of maple 3-1/4" square and 1-1/2" thick. The upper arm that connects to and supports the Mitremate track is 7-3/4" by 1-1/2" and 3/8" thick. It has two 5/16" diameter holes for the mounting screws. The lower arm acts as a safety tab to make sure the Mitremate is inserted fully down between the jaws. It is 3-3/4" by 1-1/2" and 1/4" thick. These two arms are thicker than the original metal pieces because the wood would otherwise be too weak.
You will also need two 1/4-20 machine screws with nuts for each bracket. These will attach the new brackets to the T-track slots in the bottom of the Mitremate. The nuts must be square like the original ones were, not hexagonal. Hexagonal nuts won't work because they just spin in the T-track slots when you try to tighten the screws. The length of the screws will depend on the thickness of the top piece of maple that they are going through. For the 3/8" thickness I used, my 3/4" screws were just a little too long, so I added washers to go under the heads and take up enough of the extra length.
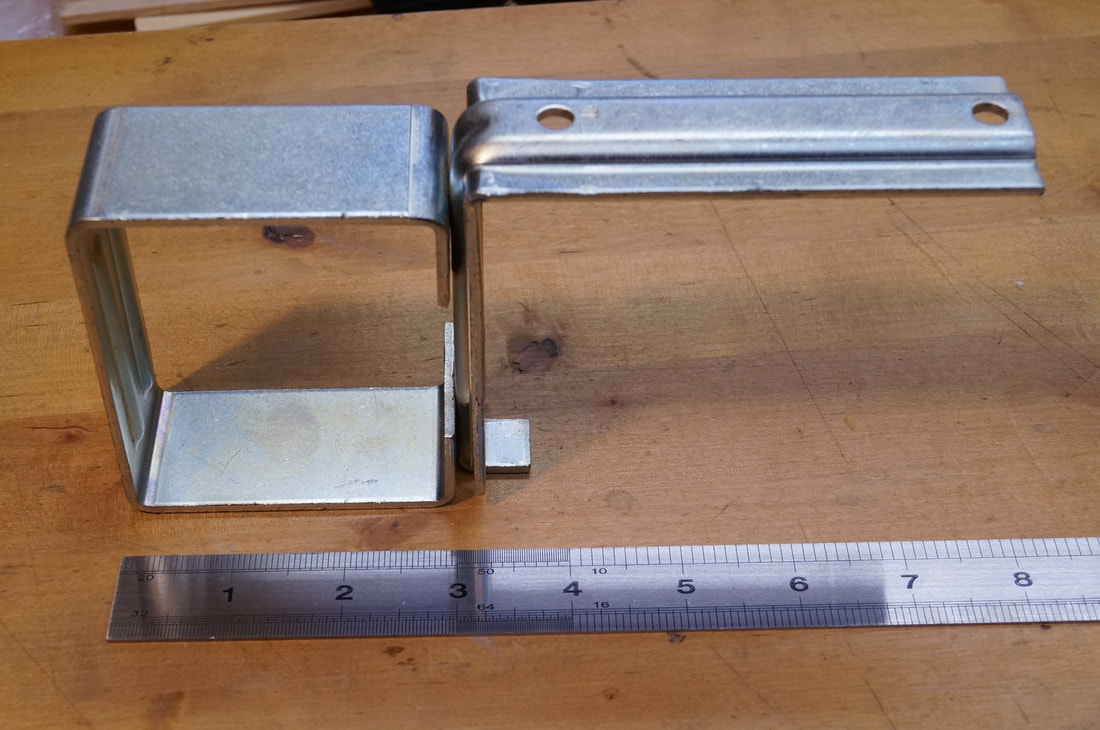
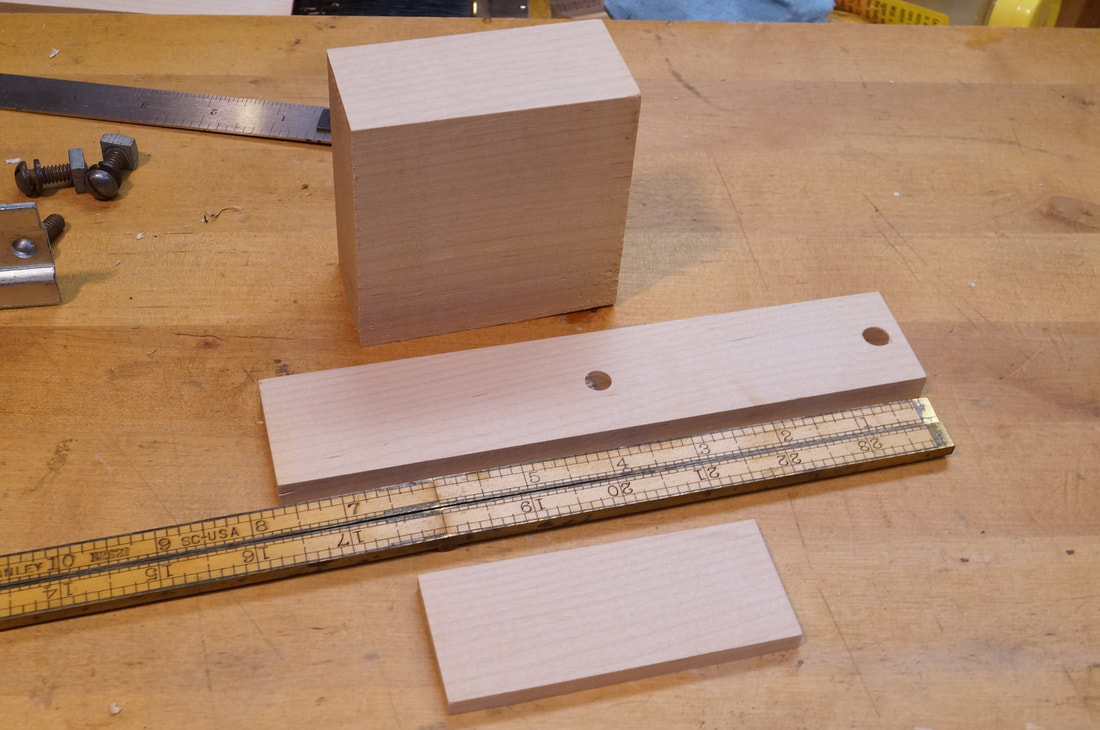
The first photo below shows one of Black & Decker's metal brackets for the Mitremate. The next photo shows the three pieces of maple that will combine to make the replacement bracket. Following that is another view of the pieces of the new bracket along with all of the relevant dimensions.
Here is a brief description of what was involved in making the pair of replacement brackets. You can find the owner's manual for the Mitremate on my Documents page, with drawings of the original parts and instructions for how to assemble and use it. I also have a full page about the Mitremate itself.
I'm a woodworker, not a metalworker, so I made my replacement brackets from some scraps of hard maple, sized to closely match the overall dimensions of the original metal brackets. They are made of three pieces glued together, shown in the photos below. The part of the bracket that clamps between the jaws is made of a block of maple 3-1/4" square and 1-1/2" thick. The upper arm that connects to and supports the Mitremate track is 7-3/4" by 1-1/2" and 3/8" thick. It has two 5/16" diameter holes for the mounting screws. The lower arm acts as a safety tab to make sure the Mitremate is inserted fully down between the jaws. It is 3-3/4" by 1-1/2" and 1/4" thick. These two arms are thicker than the original metal pieces because the wood would otherwise be too weak.
You will also need two 1/4-20 machine screws with nuts for each bracket. These will attach the new brackets to the T-track slots in the bottom of the Mitremate. The nuts must be square like the original ones were, not hexagonal. Hexagonal nuts won't work because they just spin in the T-track slots when you try to tighten the screws. The length of the screws will depend on the thickness of the top piece of maple that they are going through. For the 3/8" thickness I used, my 3/4" screws were just a little too long, so I added washers to go under the heads and take up enough of the extra length.
The first photo below shows one of Black & Decker's metal brackets for the Mitremate. The next photo shows the three pieces of maple that will combine to make the replacement bracket. Following that is another view of the pieces of the new bracket along with all of the relevant dimensions.
|
|
|
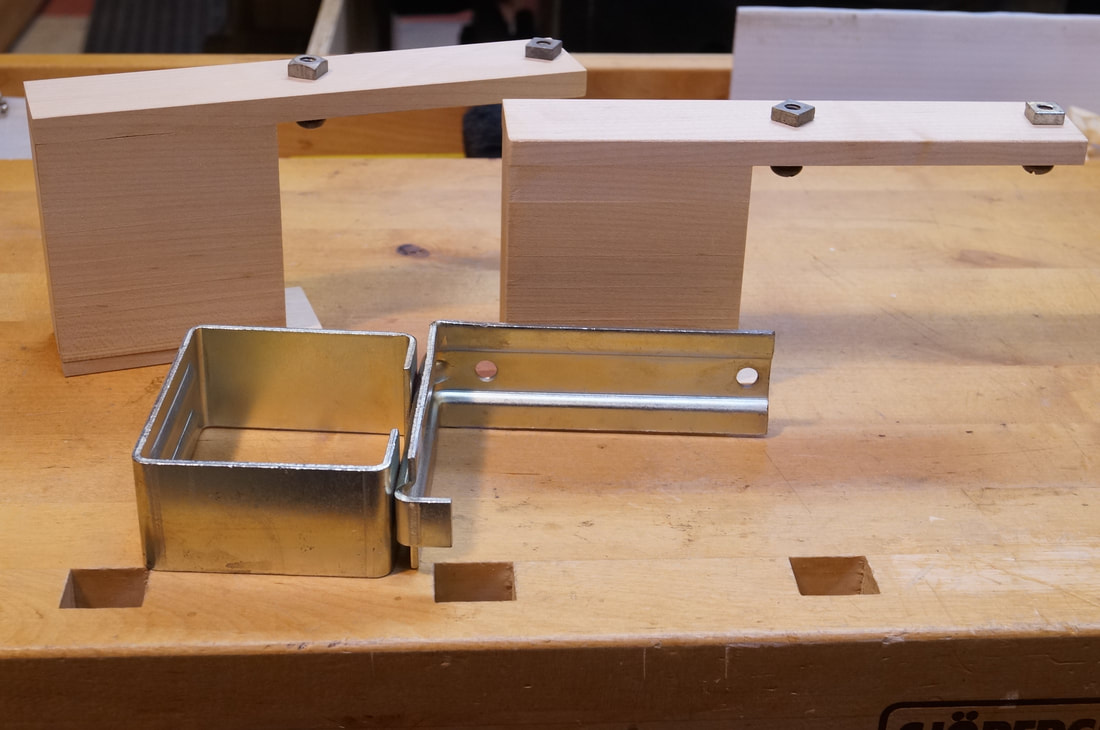
The three pieces of maple are glued together to create the finished bracket. If you don't have complete confidence in the strength of your glue joint, you may want to reinforce the upper connection with wood screws.
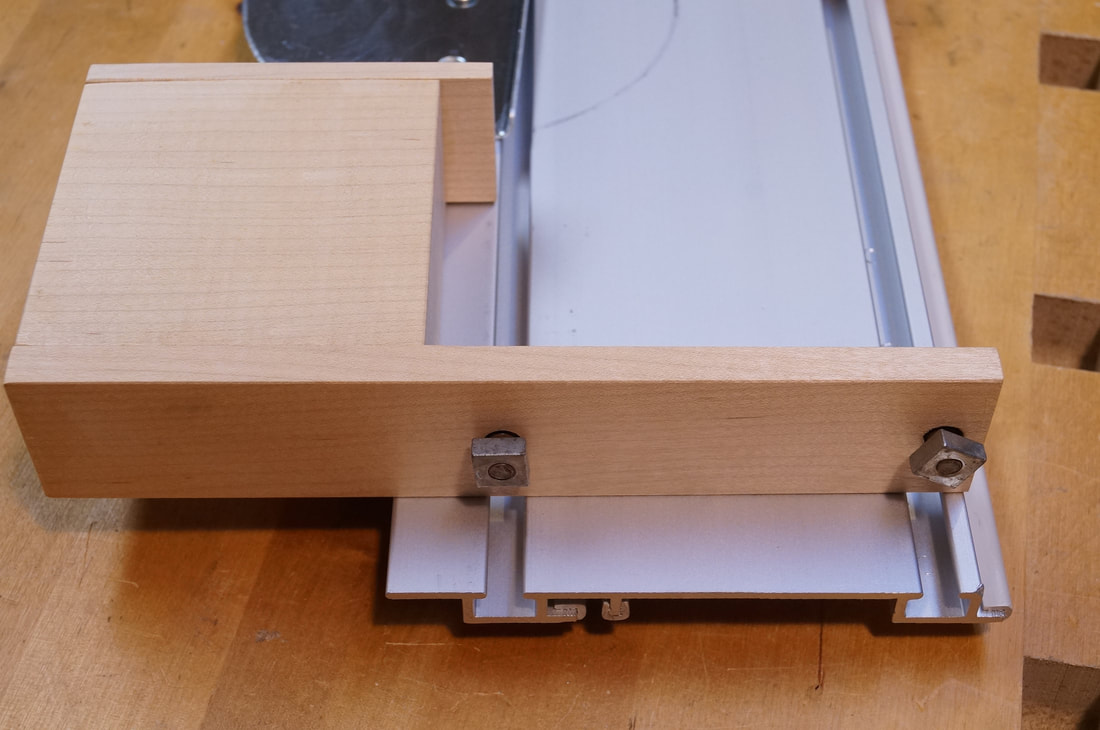
You can see the pair of finished brackets in the first photo below, with the machine screws for the T-track inserted into the holes from below and the nuts attached. The next photo shows a bottom view of the Mitremate and how the nuts line up with the T-tracks. Following that is a view of the Mitremate right-side-up with the nuts starting to slide into place.
You can see the pair of finished brackets in the first photo below, with the machine screws for the T-track inserted into the holes from below and the nuts attached. The next photo shows a bottom view of the Mitremate and how the nuts line up with the T-tracks. Following that is a view of the Mitremate right-side-up with the nuts starting to slide into place.
|
|
|
|
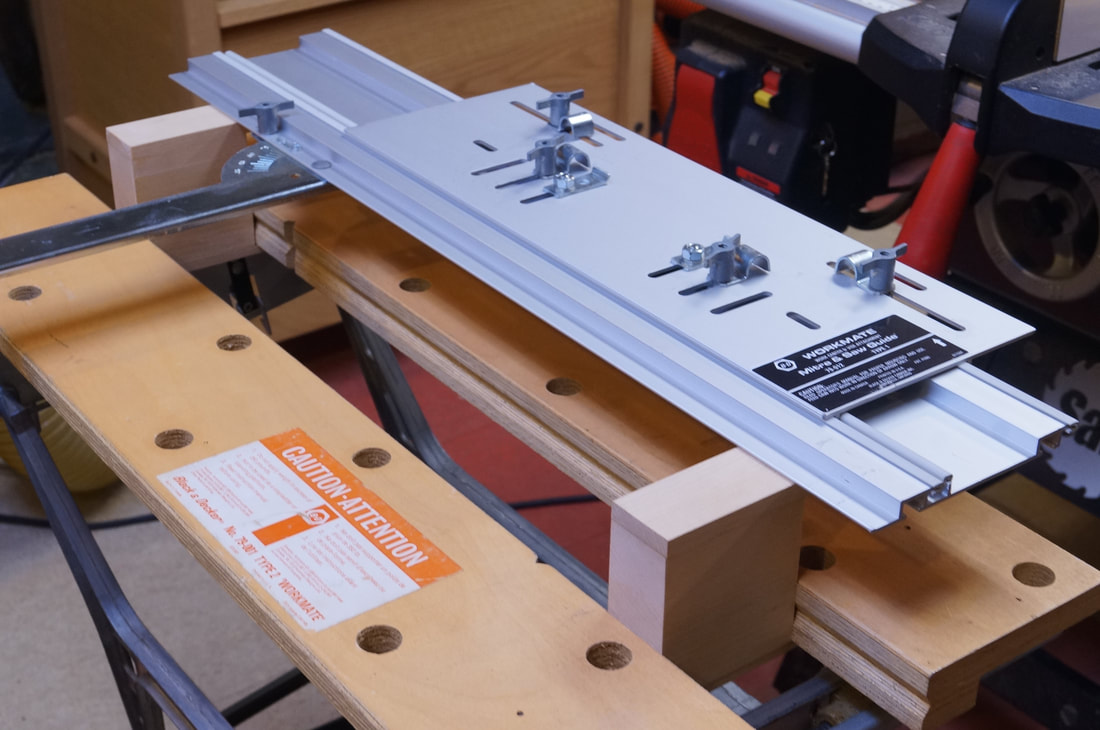
Finally, on the left, this is what the completed Mitremate looks like with its new brackets installed on a Workmate.
|
